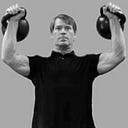
Double Kettlebell Exercises — Ultimate Tension For A Bigger Press
The Press can be broken down into 2 parts —
1. Stabilizing parts
2. Moving parts
Stabilizing Parts.
I view everything listed below the sternum, with the exception of the lat( s) as “stabilizing parts” for the Press. In my mind, this entire location, from the breast bone to the feet, forms a pillar from which you press the weight from point A to point B — from your shoulder to lockout. If this location moves, then there is a power leakage. Force is no longer directed exclusively at the kettlebell( s) but leaks out through the hole in the pillar.
There are four locations that need to remain tense during the ascent of the kettlebell. They are -.
The Feet. The feet must be pressed through the ground. I visualize them as roots of a tree.
The Legs. The kneecaps ought to be pulled up into the groin, making the quads contract.
The Excess. These need to be pinched tight, like holding a coin in between the cheeks. (Great images, I understand …).
The Abs. Must be braced as if ready to absorb a punch.
Once again, these locations form the pillar from with to push.
The Moving Parts.
These are the parts that actually move the kettlebell. They are -.
The Lat. This forms the “rack” from which to press and stabilizes (read: safeguards) the shoulder joints (the acromioclavicular joint, the glenohumeral joint, and to a lower degree, the sternoclavicular joint).
The Deltoids. Responsible for raising the arm.
The Triceps. Responsible for lockout.
Most people concentrate on # 2 and # 3 above and forget everything about the lat in their efforts for a larger Press. And then they end up with a rotator cuff injury — particularly, the supraspinatus, which gets pinched in the acromioclavicular area throughout the Press because the lat is no longer engaged to support the entire joint structure.
So How Do You Take full advantage of The Stress?
Rather simply, practice.
Invest the majority of your time concentrating on tensing the supporting parts while raising lighter loads. Not always light loads, but lighter loads. Definitely not heavy loads. (Remember, what you practice becomes permanent, and definitely under difficult circumstances. Raising heavy, near optimum loads are demanding situations.).
Concentrate on driving your feet through the flooring while pushing. Take notice of the feedback your body provides you.
Concentrate on pulling your kneecaps into your groin while pushing. Once again, take note the to signals your body gives you.
Focus on pressing with your gluts pinched. And then your abs braced. And you guessed it, take note of the feedback your body is providing you.
And then play with combinations — squeezing your excess and tensing your abs; pushing your feet through the floor and pulling up your kneecaps. Usage various combinations till you can do all four at the same time.
Keep playing, experimenting the lighter weights concentrating on the “stabilizing parts.” The lighter the weight, the more associates you can do before fatiguing. The more associates you can do, the more you cement the pattern into your nerve system. And the earlier it will be that you can lift the larger weights without having to think about contracting this muscle which — you will have already established a pattern, and it will end up being essentially second nature.
That way when you go to move the larger weights, you will already be maximizing stress and will have already plugged the power leakages. What once felt heavy will begin to feel light.
Then you can focus on dialing in the “moving parts” of the Press.
How long can you expect until you begin seeing results?
Immediately.
Apply these concepts to your Press practice before moving on to anything elegant. You’ll discover advance the first time you implement these strategies. And again, the more you implement them into your training — your strength practice, the easier and more familiar they’ll end up being, yielding strong, discomfort and injury-free training for several years to come.